Tuesday 28 August 2018

Dress up your storage with Stamperia.

    My scrapping mojo appears to be on holiday at the moment
and I was wracking my brains as to what I could create for this post.
 I have some absolutely beautiful papers in my DT kit, from a fairly new company to Papermaze, called Stamperia and I really loved the look of a sheet called Peony and Laces.......it was this sheet that inspired this project.


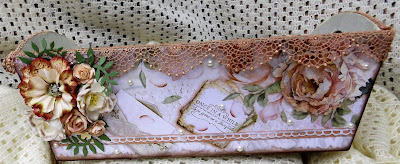
I bought this wooden trough a couple of weeks ago from a Pound Shop and it has sat empty on my kitchen table ever since. When I looked at the sheet of Peony and Laces it made me think of my ever growing collection of laces, ribbons and trims that I have stuffed into plastic boxes in my craft room....my favourites are my vintagey cream and vanilla trims and I decided they needed a pretty new home!
 

I covered one side of the trough with a panel cut from the sheet of Peony and Laces and the other side
was cut from the sheet of Peony and Letters. The left overs were used to cover the ends of the trough.


I gently inked around all of the edges of the trough using Tim Holtz Distress Ink Gathered Twigs to give it a slightly distress, aged look. And then picked one of my favourite trims and stuck it all the way round the top edges, allowing it to drape over the sides.


One of my other favourite embellishments is Blossoms, especially paper ones. I had a couple of lovely ones in my kit and also had a rummage in my own stash for a few more, along with some die cut Bazzill cardstock leaves. There is a super selection of Blossoms here in the shop to look at.


I also used a wooden word saying LOVELY which I inked with Bronze and Gold inkpads and made the word TRIMS using some metallic chipboard letters from my own stash. There is a vast selection of Alphabets in every colour and material HERE in the shop.
I then just added a few flat backed pearls to finish off the decorating....... and piled the trough up with all my lovely trims...they look much nicer in there than stuck inside a plastic box that's for sure!


                                   A couple of photos without all the trims in.


These troughs look lovely when decorated and could be used for all different things....as gift baskets on a theme, as storage around your own home....anything! And when there are such beautiful papers about like the Stamperia Range, what is stopping you?


Thank you so much for looking at my project today, I hope that you like it and you pop along to the shop and have a look at all the wonderful Stamperia Range and the other lovely goodies there that are for sale........ and don't forget the amazing SUMMER SALE is still on, full of bargains....too good to miss!

Warmest wishes
Anita xx

Wednesday 1 August 2018

Is 50 too old for Unicorns? ......... a layout using Stamperia.

Hi There

Today I have a layout to share using a brand new manufacturer to Papermaze, called Stamperia! The shop stocks a good selection of their papers and they cover various themes. The papers themselves are super quality, nice and thick and the colour ways are beautiful.

I chose to use some photos from my 50th Birthday (earlier this year) when my lovely daughter and sister joined forces and made me a luscious rich chocolate layer cake and a fabulous, huge well fed unicorn ( made from fimo!)


 I had a sheet of light cream cardstock in my kit that I wanted to use to base the layout back onto, but needed it to blend in, so I used 2 Distress Oxide Ink pads : Peacock Feather and Seedless Preserves and applied them using some cellophane packaging and a water mister.


I also used the same colours and technique on the sheet of Wonderland Unicorn that the layout is created on. Where some of the patches were particularly wet, I blew hard and created the runs down the page.
Using some white acrylic paint I dry brushed around each photograph to create a soft matt and also around the entire edge of the layout.


I had some Prima Blossoms in my kit and I wanted to make them work with the page, so I used the same inks on these, gently patting a bit of each colour on and then misting with the water spray again to help blend the colours.


 I had bought a 2nd sheet of Wonderland Unicorn and so cut out the 2nd Unicorn and layered it on the original page using some foam pads for dimension, then gave the wings, mane and tail some magical sparkle using some Stickles.

 I also had some lovely cotton lace in my kit, this took some of the ink really well and stained it to co-ordinate with the rest of the page.


I tore a slice out of the paper on the right hand side and rolled each section back, to reveal some of the inking underneath. Then used some irridescant, sparkly thread to stitch criss crosses along the length of it.

I cut a floral section from the back of a sheet of Wonderland Dragonfly and used a couple of other scraps of left overs and layered them up behind the photos along with a couple of small plastic doily embellishments.
The title was made using various alphabet stickers, including Simple Stories Snap Studio, Martha Stewart and AC Thickers.
I used a few different paper blossoms and lots of flat backed AB crystals scattered about ( because you can never have too much magical sparkles can you??)

                                                        A couple more close ups.


So, if you want to see some absolutely gorgeous new papers, then pop over to the shop and have a good look round. And don't forget the super Summer Sale is still on and there are some fabulous bargains to be found.....don't miss out!!

Happy Scrapping!!

Anita xxx